Setting up
The PCIbex Farm
The easiest way to use PennController is by using the free PCIbex Farm server. The PCIbex Farm builds and hosts PennController experiments for you, meaning that you can focus on writing your experiment scripts.
For more information, see Core Concepts > PCIbex Farm.
Creating a PCIbex Farm account
- Go to the PCIbex Farm account creation page.
- In the “New user” box, enter the following information:
- In the “Username” field, enter the username that you want for your account.
- In the “Password” field, enter the password that you want for your account.
- In the “Verify password field”, re-enter the password that you used in the “Password” field.
- (Optional) In the “Email” field, enter an email that you want to link your acccount to. PCIbex Farm does not share your email, and only sends emails for password retrieval purposes.
- Click Create account.
Creating a new experiment
- Go to the PCIbex Farm home page.
- Click Design experiments.
- Enter your login information and click login.
- Click Create a new experiment.
- In the “Name” field, enter “Tutorial”.
- Click Create.
- Click Tutorial to open its experiment project page and begin editing.
Importing resource files
The Basic Tutorial uses the images 1fishSquareTank.png and 2fishRoundTank.png, the audio file 2fishRoundTank.mp3, and the starter experiment script main.js.
We’ll import these files, as well as resource files for the Advanced Tutorial, from GitHub.
- Click Update from git repo », under Experiment ‘Tutorial’.
- In the “repo url” field, enter
https://github.com/angelica-pan/BasicTutorial - Click Sync.
- If the import was successful, the imported files will appear in the experiment project page’sScript or Resources folders, and briefly flash red.
To learn more about importing files from GitHub, see Syncing with a GitHub repository.
Editing an experiment
The Script folder contains the file main.js, the experiment script. Update your experiment by editing main.js in the script editor and saving your changes.
Run an experiment by clicking the link at the top of the experiment’s page: https://expt.pcibex.net/ibexexps/USER_NAME/EXPERIMENT_NAME/experiment.html
The script editor has the following features:
- Two links at the top for easy access
- PennController docs: Links to PCIbex documentation.
- ibex docs: Links to the original Ibex documentation.
- Autocomplete
- Start typing within the script editor.
- A modular window with suggested command names for autocompletion will pop up.
- Navigate the autocomplete suggestions with the Up and Down arrow keys, and press Enter/Return to select a suggestion.
- Four buttons at the bottom
- Discard changes: Close the script editor without saving any changes.
- Save changes: Save changes without closing the script editor.
- Save and close: Save changes and close the script editor.
- Save and test: Save changes and open the updated experiment in a new tab or window.
Creating a trial
Create a trial by calling the PennController.newTrial("TRIAL_LABEL,...") command, where:
"TRIAL_LABEL"is the label/name of the trial (optional, but highly recommended)...refers to sequences of elements and commands that define what happens in the trial
- Click main.js to open
main.jsin the script editor - Create a trial labeled
"experimental-trial":
@// Type code below this line.
@
+// Experimental trial
+PennController.newTrial("experimental-trial")
At this point, we’ve created an empty trial that does not do or contain anything. If you run the experiment, it’ll end immediately with the message “The results were successfully sent to the server. Thanks!”.
Removing the PennController. prefix
All PennController commands begin with the prefix PennController., in order to avoid naming conflicts with other JavaScript modules. The command PennController.ResetPrefix(null) removes the prefix for all subsequent commands. You can also pass a string instead of null as an argument, which will reset the PennController. prefix to the aforementioned string for all subsequent commands.
We recommend calling PennController.ResetPrefix(null) at the start of every experiment script for readability and convenience.
Remove the PennController. prefix:
@// Type code below this line.
@
+// Remove command prefix
+PennController.ResetPrefix(null)
@
@// Experimental trial
!newTrial("experimental-trial")
From this point on, this tutorial assumes that the PennController. prefix has been removed. For example, in prose we’ll say “the newTrial command” instead of “the PennController.newTrial command”.
The exception is the PennController.ResetPrefix command, which must have the PennController. prefix when it’s first called.
Using the debugger
PennController comes with a built-in debugger that helps detect typos, syntax errors, and other issues.
It appears as a small window in the bottom-right corner of the screen when you run an experiment:
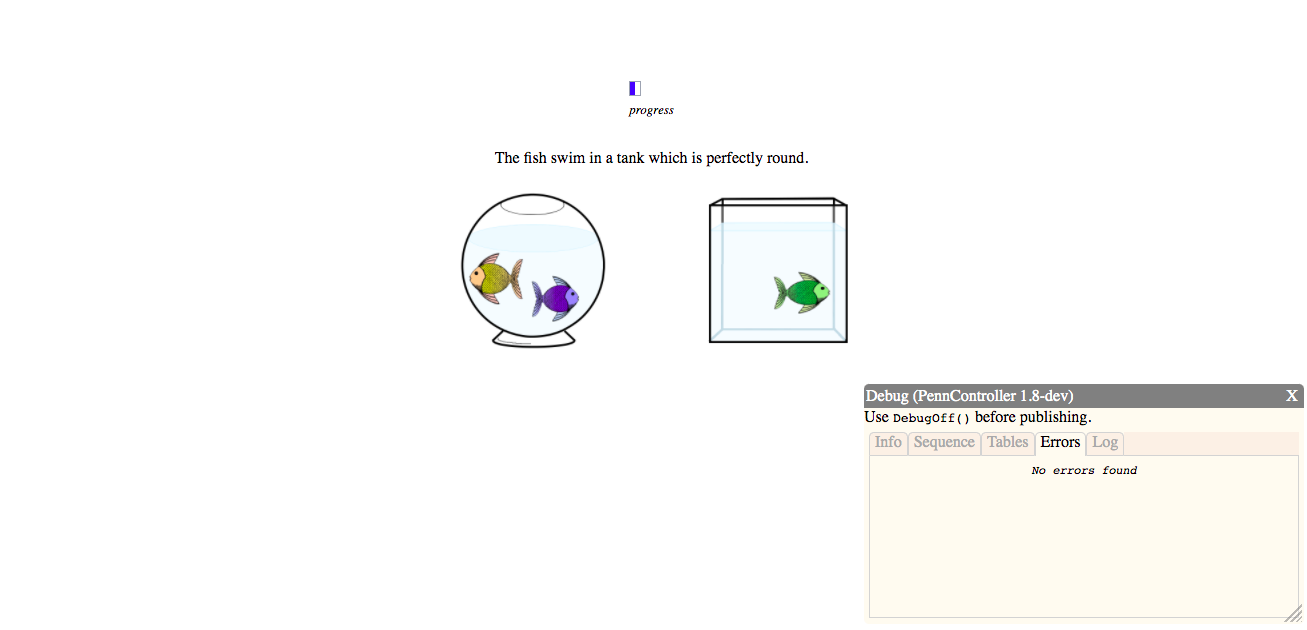
The debugger window has five tabs:
- Info: Displays information about the current trial.
- Sequence: Lists all trials, and allows you to skip to any particular trial.
- Tables: Lists all tables.
- Errors: Presents any error messages.
- Log: Reports whenever a command is executed on an element, or whenever a resource is successfully preloaded.
These tabs might not make sense until you learn more about PennController experiments, but the important part to know is that you should use the debugger as you build and test an experiment. You’ll inevitably face problems, and the debugger will make it easier to solve them.
Turn off the debugger with the DebugOff command when you’re ready to publish your experiment and collect experimental data.
We recommend reading the Debugger documentation after you’ve completed this tutorial and the Advanced Tutorial, and are more familiar with PennController experiments.